Immersve APIs are authenticated with either long-lived API Keys or short-lived User Session access tokens. Permissions are controlled by roles, scopes and accounts. Access tokens can be renewed with a session refresh token. Read on to learn more about the Immersve authentication schemes or try out the sandbox credentials to quickly get started. Contact us if you are ready to provision credentials for your application.
API Key Authentication
The API Key authentication scheme provides enduring access to Immersve APIs. API Key authentication is most suitable when your client integration is running on your backend server. This will typically be the case for a Custodial Wallets card issuing solution. API requests using the API Key auth scheme must include the x-api-key and x-api-secret headers.
| Header | Description |
|---|---|
| Identifier for the Immersve API key. May be logged. | |
| Secret for the Immersve API key. Should not be logged. | |
| Optional target account hint for permission resolution. Defaults to the account that owns the API key. |
The permissions granted to an API Key are determined by its role. See the Roles and Permissions section below for the available roles.
User Session Authentication
The User Session authentication scheme allows client applications to act on behalf of users within scopes explicitly granted by the user. User Session authentication is most suitable when your client integration is running directly on the user's device. This will typically be the case for a Web3 Wallets card issuing solution. API requests using the User Session auth scheme must provide an access token in the authorization header.
| Header | Description |
|---|---|
| authorization | The access token obtained via user login or token refresh. The value must be prefixed with "Bearer ". |
| Optional target account hint for permission resolution. Defaults to the primary account associated with the authenticated session. |
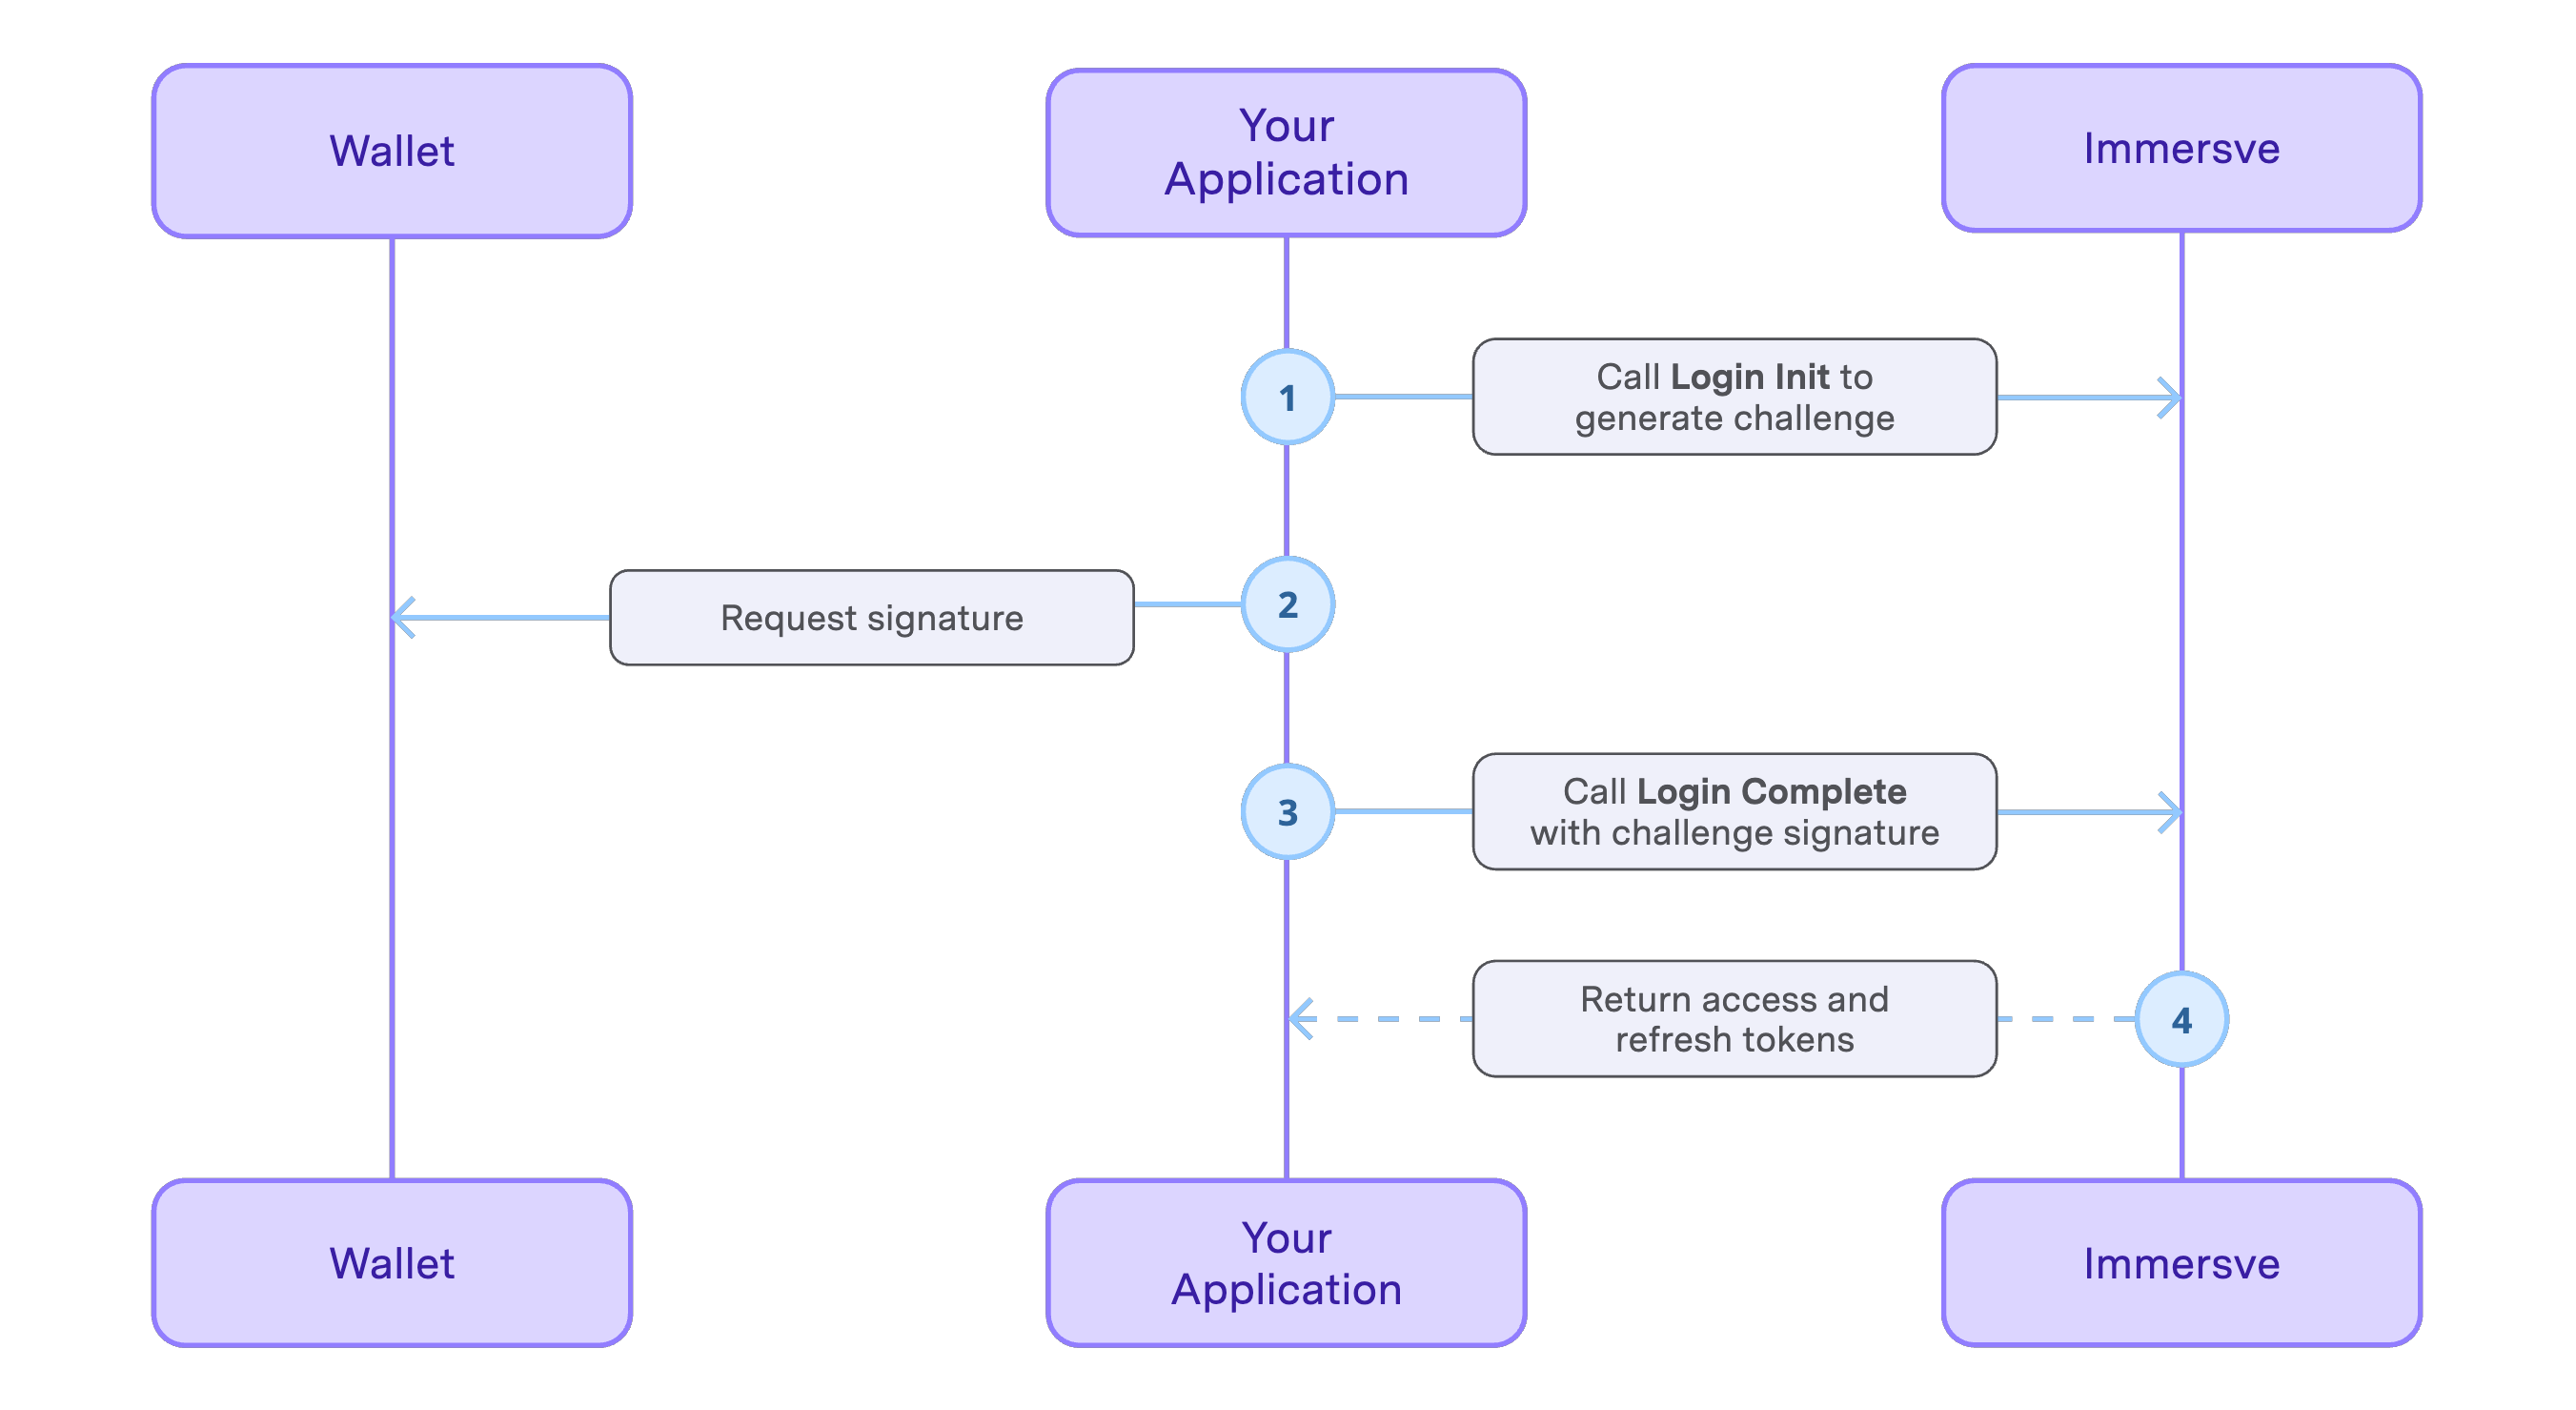
User Session tokens are created by using the Initiate Login and Complete Login endpoints. After completing login, you will have an access token and a refresh token. The access token will be used for subsequent interactions with Immersve API endpoints. The refresh token will be used to renew an expired access token.
Immersve users are identified by the web3 address used to login. Login methods for each of the Supported Chains are defined in the Login section below.
The permissions granted to an access token are determined by the role of the authenticated user (with respect to the target account) along with the scope requested by the client application when initiating login. Available roles and scopes are described in the sections below.
Roles and Permissions
Roles define the permissions available to a User or API Key. The following roles are available.
| Role | Description |
|---|---|
| Full control over all resources within an account. This role is granted to users that create cardholder accounts via the self-custodial login flow. | |
| Management of partner account resources such as client applications, API Keys and Funding Channels. | |
| Management of cardholder resources such as cards and funding sources. This role should be used by custodial card issuing integrations. |
Client Scopes
Client Scopes apply additional restrictions to the permissions granted to an authenticated user session. When a client application initiates login for a user, one or more valid scopes must be provided. Client scopes are not used by API Key authentication.
| Scope | Description |
|---|---|
| Manage cardholder resources such as Cards and Funding Sources. This scope should be used by non-custodial card issuing integrations. |
Account Selection
The optional x-account-id HTTP header selects which account to use when evaluating permissions for a request. This is needed when an authenticated session or API key is scoped to multiple accounts. For example, this header must be supplied when interacting with child cardholder accounts in the context of a custodial card issuing integration.
Login Flow
Login is initiated by supplying the user's web3 address to the Initiate Login endpoint. Proof of ownership over the web3 address is provided by signing the login challenge message using the private key for the wallet. Submitting the challenge response to the Complete Login endpoint creates the User Session and returns access and refresh tokens. The Sign Up endpoint can be used to create a user account for first time users, this can also be achieved using the autoSignup request option on the Initiate Login endpoint.
Available login methods are listed in the following table. Refer to the login guide relating to your preferred login method for specific instructions.
| Name | Description |
|---|---|
| Authenticate an EVM wallet by using the Sign-In With Ethereum standard message signing format. | |
| Authenticate an Algorand wallet by signing with an Algorand private key. | |
| Authenticate a XRPL or Xahau wallet by signing with an XRPL private key. |
Refresh Tokens
The refresh token is a long-lived token that can be used to obtain a new access token without requiring the user to re-authenticate. Before using an access token, if the token is expired, use your refresh token to obtain a new access token. Use the Exchange Auth Token endpoint to obtain a new access token.
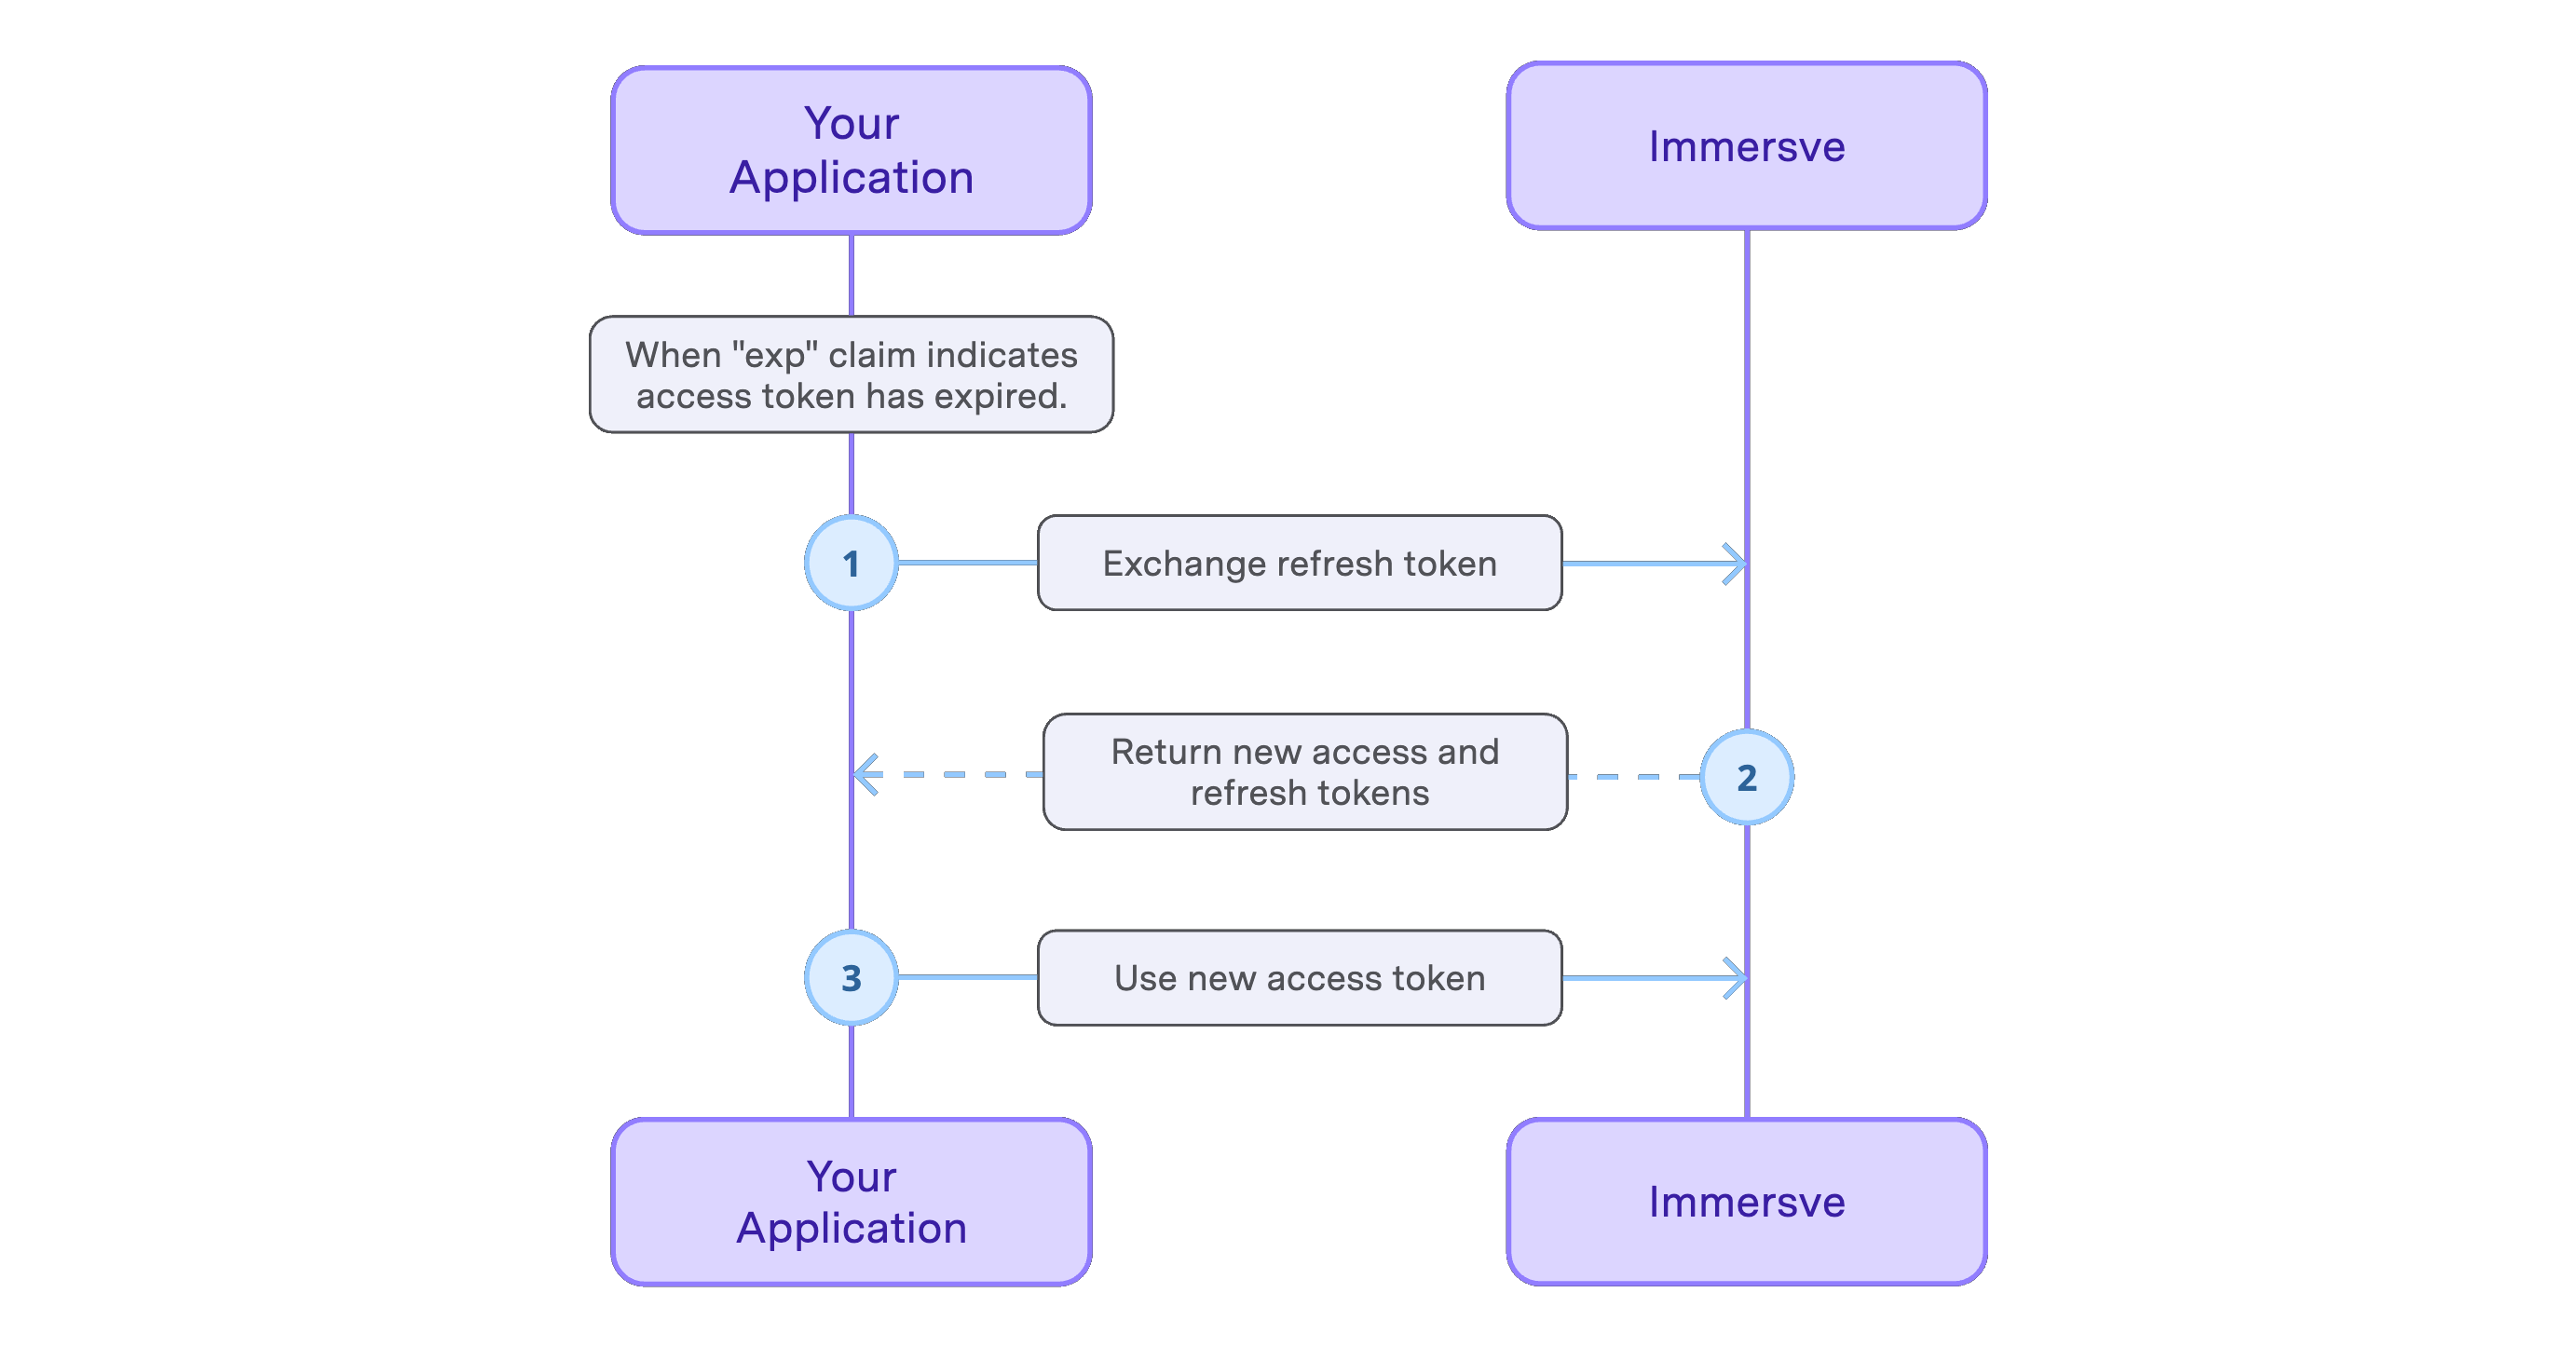
Token expiry can be checked by decoding the token as a JWT and inspecting the exp claim. Access tokens expire after approximately 20 minutes and refresh tokens expire after approximately 30 days.
Refresh tokens are single-use. After requesting a new access token the previous refresh token is invalidated. A new refresh token is returned along with the access token in each token exchange response.
Session Logout
The Logout endpoint can be used to invalidate a User Session. All access and refresh tokens connected with the session will become unusable. After logging out the client application can discard the stored session information and authentication tokens.