A Funding Source is a record of available balance against which card transactions are authorized. A Funding Source is owned by a cardholder and can be associated with many cards transacting against the same available balance. A Funding Source must have sufficient balance for a transaction to be authorized.
A Funding Source balance is eventually consistent with the on-chain deposits and withdrawals. However, the balance available to spend may differ. This could happen if deposit or load limits are exceeded. AML/CFT rules can dictate that the funds should not be included in the balance.
A card will not authorize transactions without an associated Funding Source. You must reference a Funding Source when creating a card.
Authentication
The authentication processes are described in the Authentication guide.
Funding Source Provisioning
A Funding Source is created by a request to the Create Funding Source endpoint. The funding wallet may be an EOA or a smart contract implementing the ERC-1271 interface.
Depositing Funds
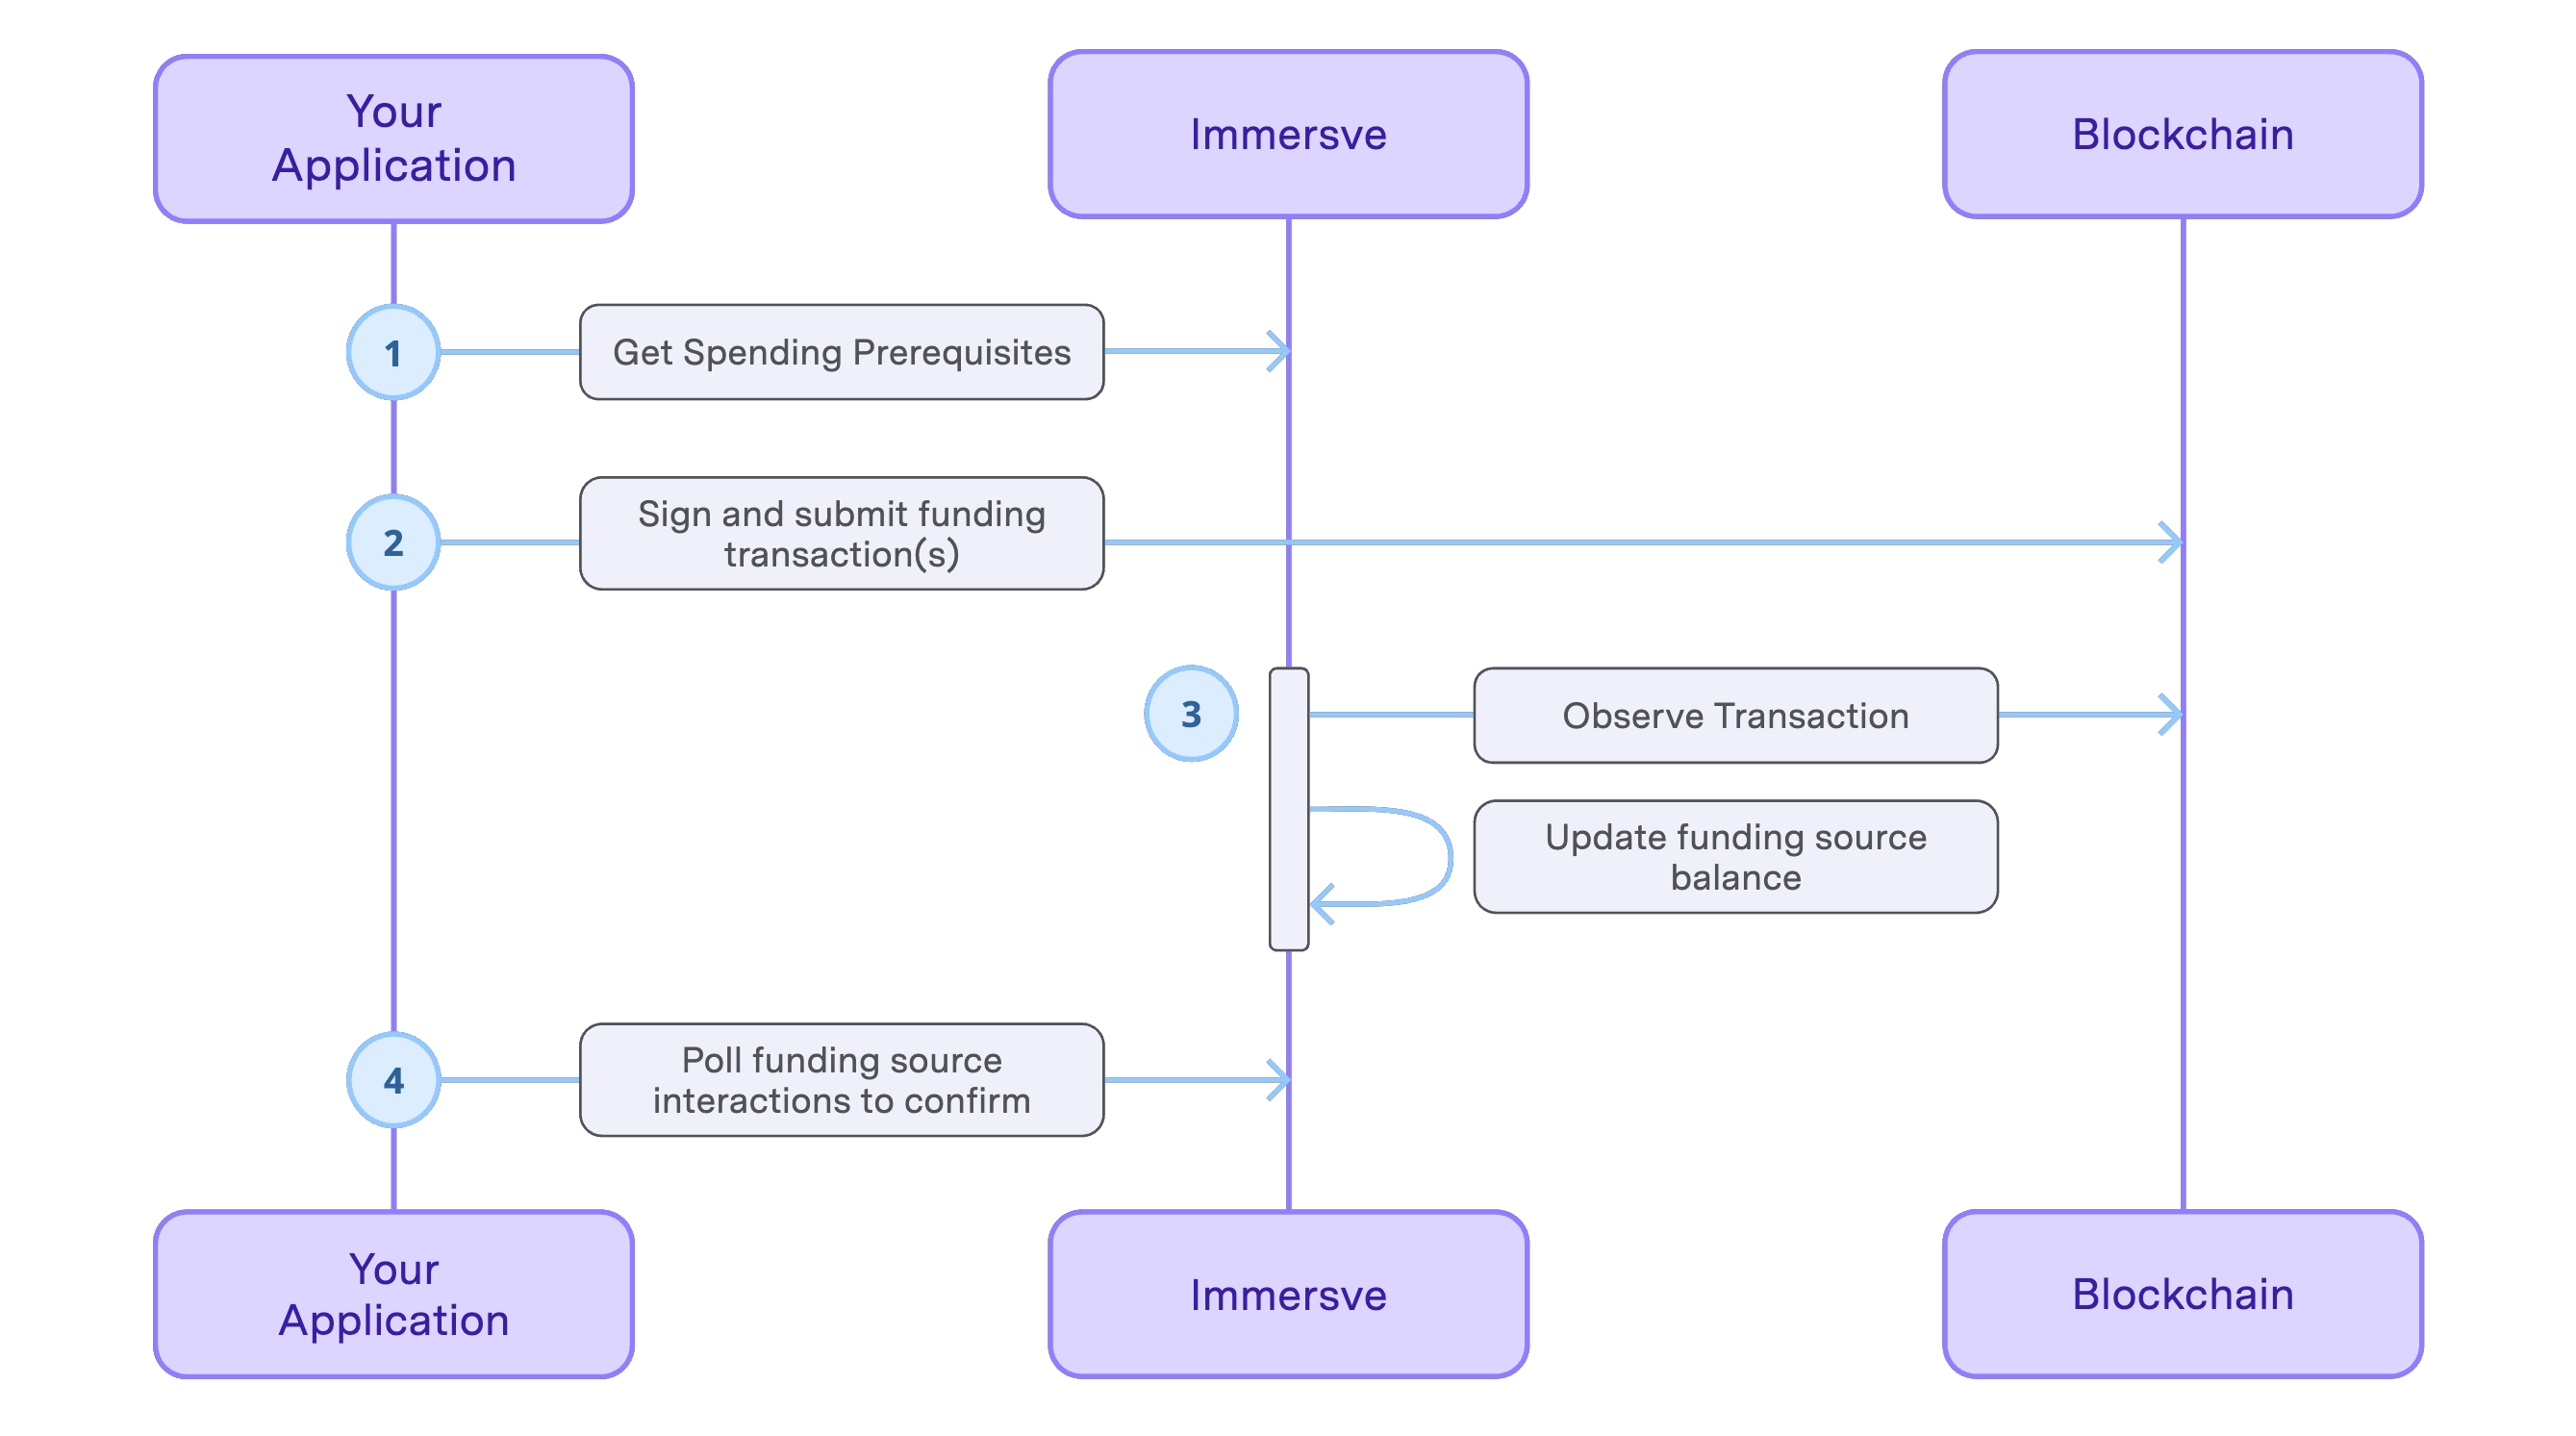
On-chain funds deposits can be made any time regardless of card or Funding Source provisioning. A Funding Source can be loaded with digital assets without using Immersve APIs by depositing funds directly to the deposit-holding address relating to the Funding Source.
However, our APIs aim to reduce the complexity of determining what is the amount of digital assets needed to meet a users desired spend in their desired fiat currency. They also provide pre-built "smart-contract-write" transactions for successful interactions with the Immersve smart contract.
If multiple transactions are present then they should be carried out in the order in which they are presented.
The client application is responsible for creating the raw blockchain transaction so that it can be signed and submitted to the relevant blockchain through the cardholder's web3 wallet.
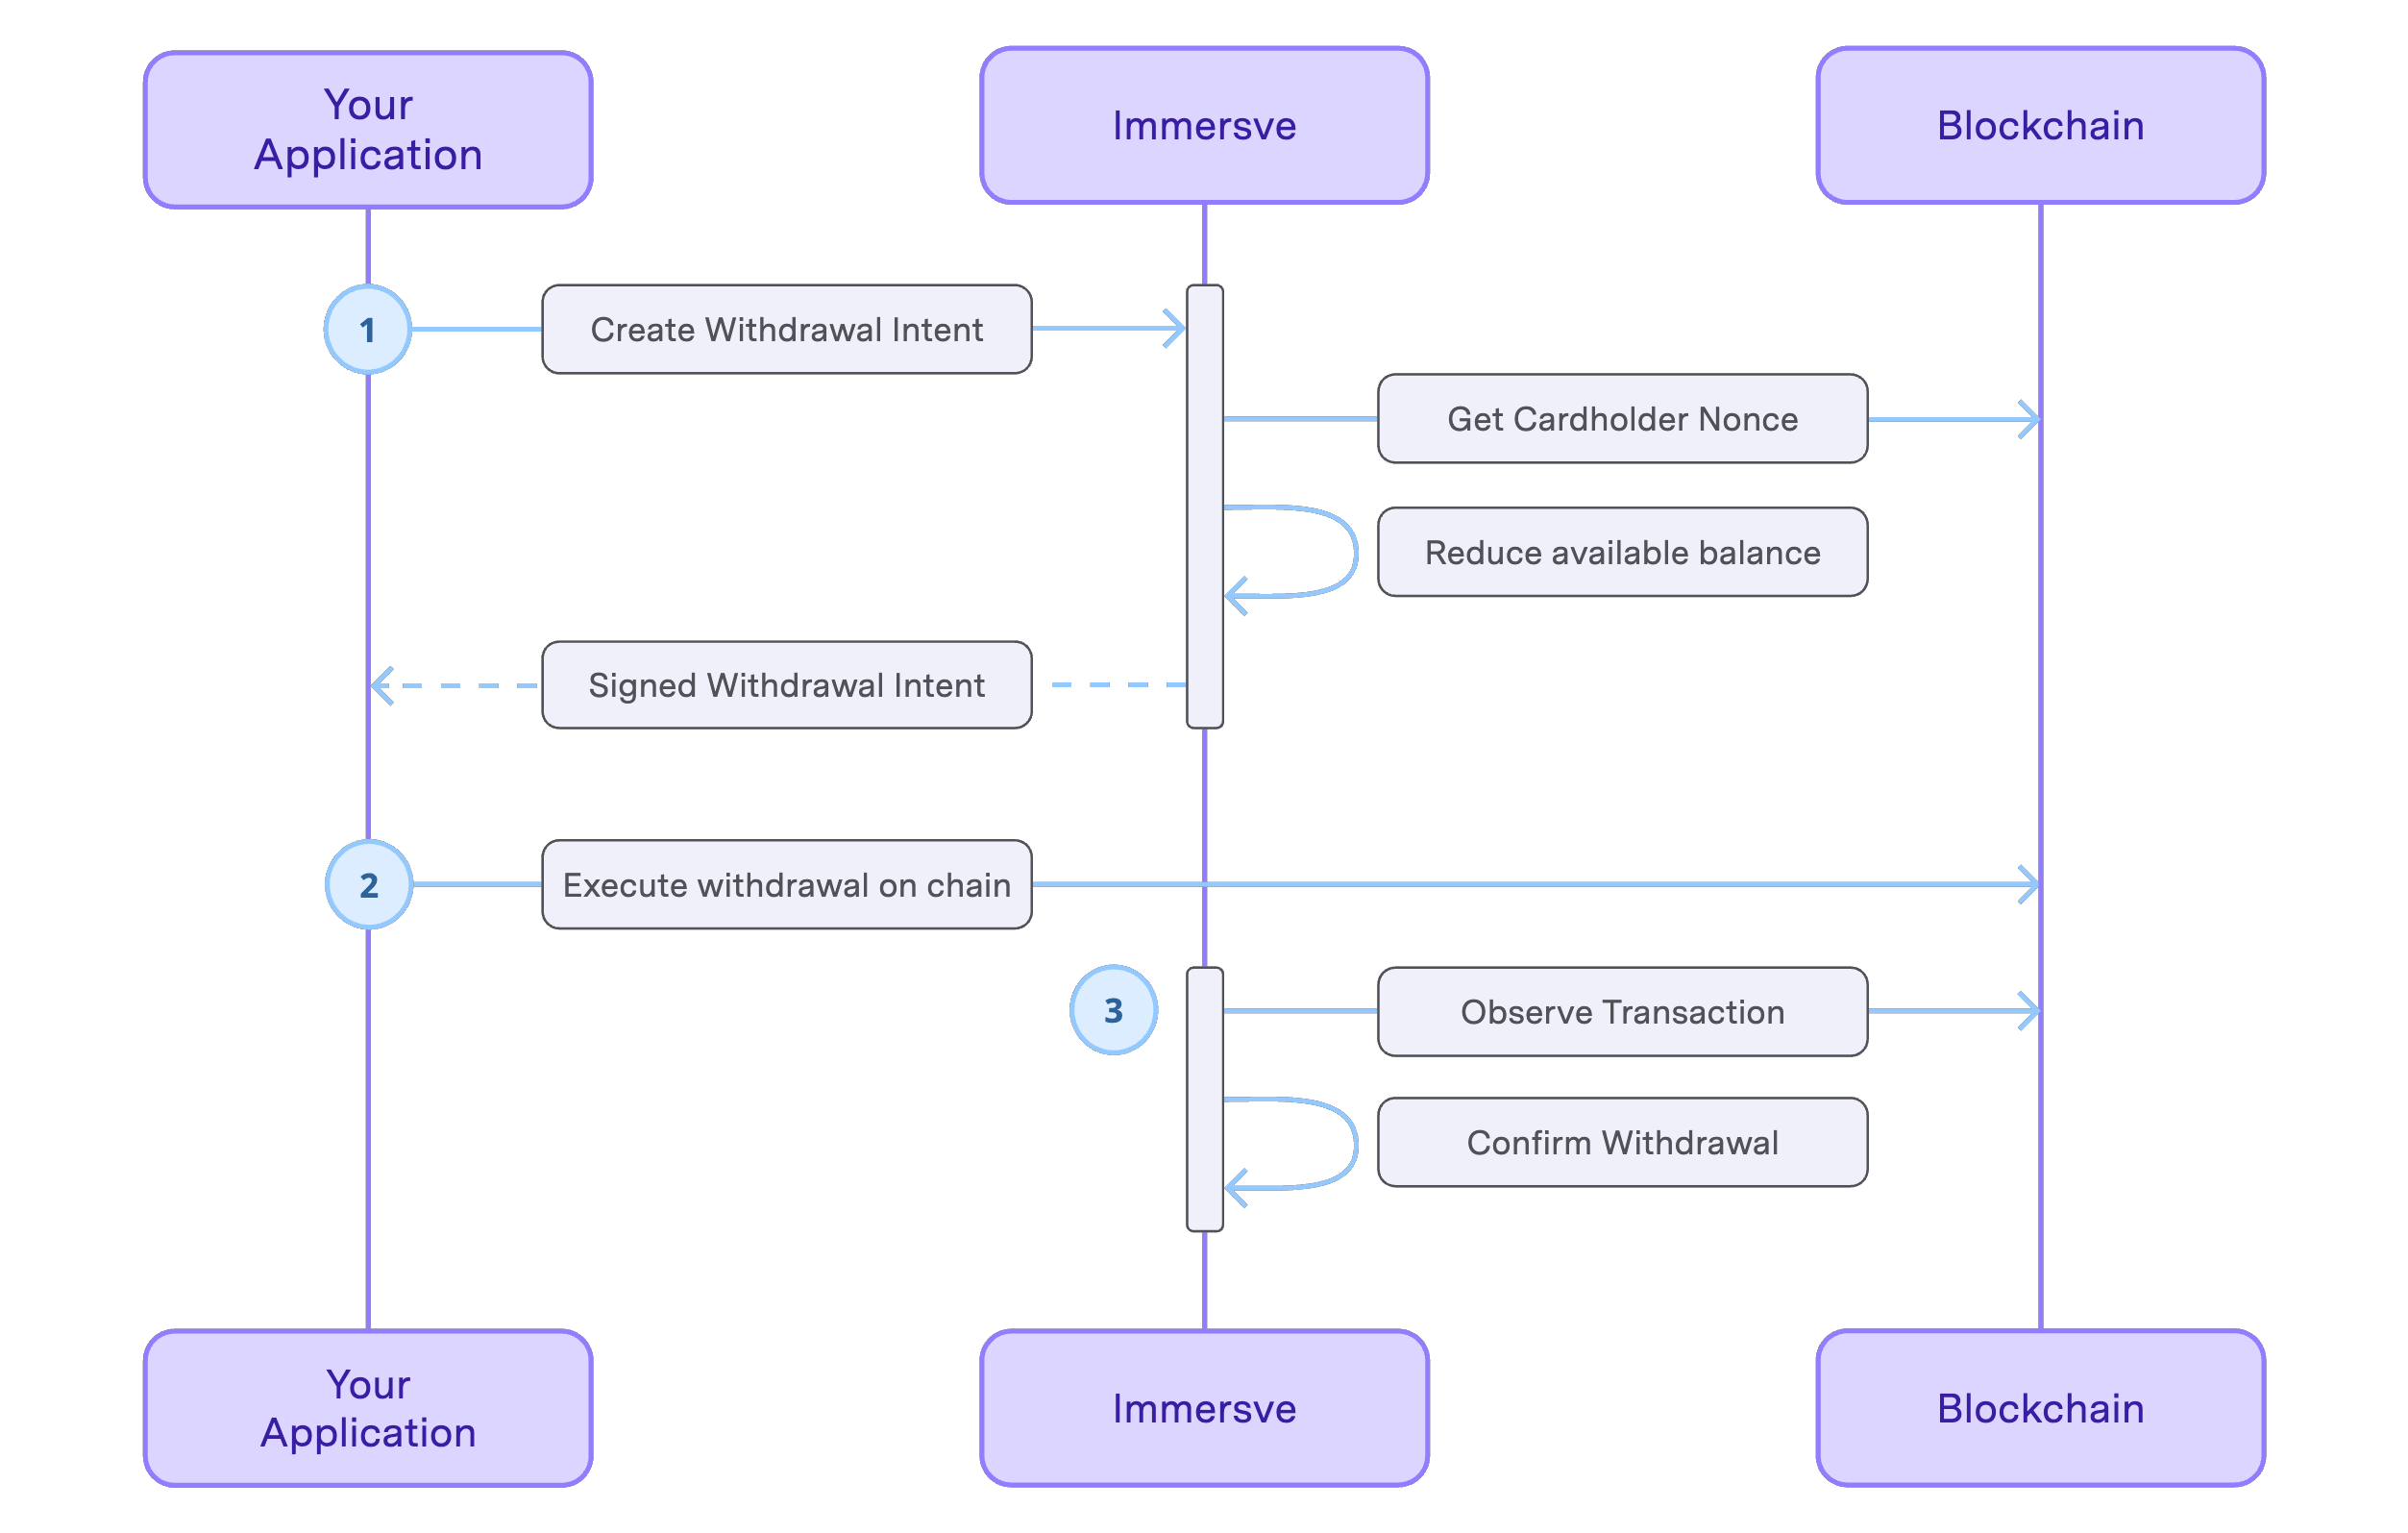
Withdrawing Funds
Withdrawals are conducted as a two-stage process:
- Obtaining an Immersve-generated signature permitting a given withdrawal
- Executing a withdrawal and observing the effect on the funding source
To begin the withdrawal process your application will call Create Withdrawal Intent, providing the amount of the intended withdrawal and a reference to the relevant funding source.
Prior to returning a response, Immersve will identify the current blockchain nonce for the cardholder. The nonce is used to ensure only the intended withdrawal intent can be executed by the cardholder. The returned withdrawal intent is valid for the period indicated by the expiresAt property.
When a withdrawal intent is created, the relevant funding source balance is debited by the amount of the funding source interaction. The funding source interaction status will be "pending" at this time and will remain so until such time as the withdrawal intent is executed.
The cardholder may create further withdrawal intents to change the amount of the withdrawal prior to having executed it. If there are multiple withdrawal intents created with the same nonce, the funding source will be reduced by the amount of the highest withdrawal intent.
To execute a withdrawal the cardholder must submit the transaction contained in the execution property of the withdrawal intent prior to the expiresAt timestamp of the intent. Your application should prompt the cardholder to sign and submit the transaction. Upon observation of the the execution of the withdrawal intent on the blockchain, Immersve will update the status of the funding source interaction. Your application should query the List Funding Source Interactions endpoint, and inform the cardholder when the withdrawal status is no longer pending.
Withdrawal Intent Javascript Example
The Create Withdrawal Intent endpoint creates a withdrawal intent for a given amount and returns the parameters needed to execute the withdrawal on the cardholder's web3 wallet.
const { abi, contractAddress, method, params} = response.data.execution.params;const contract = new Contract( contractAddress, abi, signer, // third param Signer is required);const { hash } = await contract[method](...Object.values(params));Currency Conversion
A user may be quoted a price for a purchase by a merchant in a local fiat currency. To determine the sufficient amount of local fiat currency to fund a card in its billing currency (USD), use the Currency Conversion endpoint.
The returned value can be passed to the Get Spending Prerequisites endpoint as detailed below.
Prerequisites Execution Javascript Example
The Get Spending Prerequisites endpoint returns a list of checks that must be passed before the cardholder can spend with the provided funding source. Funding prerequisites, when not completed, will have action type and params attributes which indicate how to satisfy the prerequisite. The value of the type attribute will depend on the funding protocol in use. For example, an action type of "smart_contract_write" indicates that an EVM smart contract interaction is required.
const { abi, contractAddress, method, params} = response.data.prerequisites.params;const contract = new Contract( contractAddress, abi, signer, // third param Signer is required);const { hash } = await contract[method](...Object.values(params));